
BASIC FUNCTIONS OF MY NEW PHONE…
So you have a new phone system, a cloud phone system, a UCaaS phone system, there are so many advanced capabilities of your system, but how do you do the very basic things. Let’s start with a few phone system definitions and a few basics that might be valuable to you:
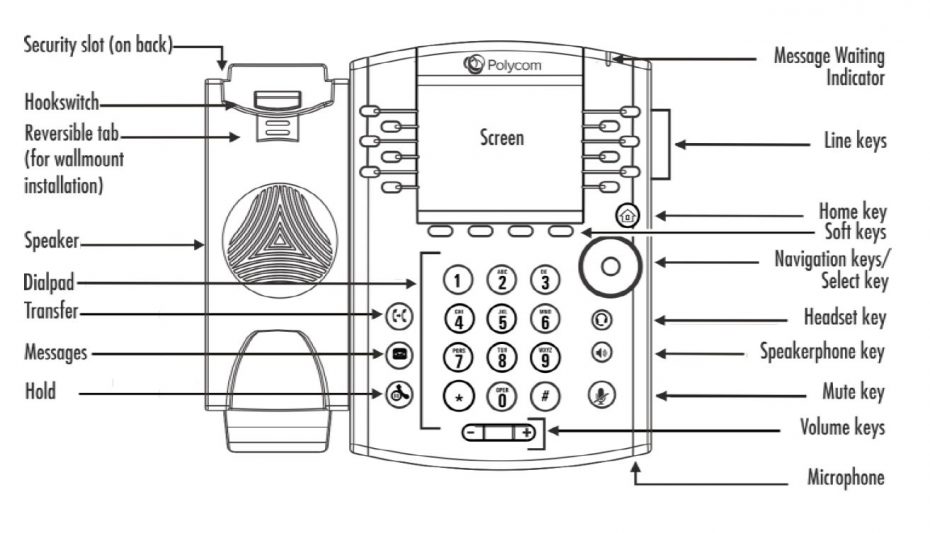
Answering A Call – Pick up the phone. To use the speaker Hit “Answer” when it is ringing OR just touch the speaker button which is the middle button to the right of the key pad. How about answering a call when you’re one the phone already? Just Hit “Answer” and it will answer the new call and put the first call on hold.
Making A Call – Pick up the phone and dial a number. To call using the speaker hit “New Call” and dial your number OR touch the speaker button and then dial number.
We want to make sure you can do both of those things, please try this out a few times, calling with the handset, the speaker, and answering your phone with the handset or the speaker. You might as well while your practicing this try the Mute button which is on the bottom right of the key pad. Mute the microphone during a call so other parties can’t hear you. To disable Mute, press again. This applies to calls using the handset, headset, and speakerphone. Nice and easy.
Adjusting Volume – To change call volume, press the volume button during a call. To change the ringer volume, press the volume button when the phone is idle or ringing
Now if you have a headset connected to your phone you can make or answer calls with the headset by pressing the headset button which is the top bottom button to the right of the key pad. Headset memory can be enabled so that new calls dialed or answered go to headset by default. We recommend Plantronics headset’s and can help you find the right model for you when you’re ready to add one.
Swiping to the left and right on a VVX 500/600 – This is a very simple very much overlooked feature we want you to try right now. While you’re on a phone, take your finger and swipe the screen to the right, you will be able to then see all your buttons again. This way you can simply press the button you want to transfer a call to very easily for a blind transfer or attended transfer (We will explain the difference.)
How about all the other buttons on the phone?
We generally use the first button or first two buttons on your phone for your personal extension. Then the rest of the buttons are available for you to customize in the way that best works for you. Other people in your company, parking spots (Don’t worry we will explain what a parking spot is.), or maybe you need a second extension to be able to dial out as a phone number with a different caller ID?
Busy Lamp Field – the button’s on your phone – We call them BLF’s , it is simply a button on your phone that has been programmed with someone’s extension number so that you can see if they are on their phone or not. If it is lit then they are on the phone, if it is not lit then they are not on the phone. That’s a nice thing to be able to know when you want to call someone. To call any of the people that are buttons on your phone just press their button. That simple!
Who do you communicate with the most? The people that you deal with the most in your company should be programmed on those buttons. Please ask your company administrator to make adjustments to your phone. They can log into the Blueline portal and change who is on each button and change the spelling of their name on the button, so you could use a nickname. Many companies put an extension number in the label. Once they make those changes and save them a simple re-boot of your phone should update your buttons.
Parking Spots – On old phone system’s you would put calls on hold and call over to the person you want to take the call and say, “pick up call on line 2” … Well in a Cloud phone system we use parking spots and possible instant messaging to communicate. There are 100 parking spots 1 to 100. You can program on one or more than one BLF buttons for a parking spot. So, you might put a button for Park 1 or Park 2 Etc. To park a call if you have the button on your phone, while you’re on the phone just press the parking button and the call will be parked. To pick up a parked call if you have the button on your phone, just press the park button that you can see a call is parked in. Ask the company administrator to add parking buttons for you, but keep in mind you can always pick up a call that is parked by pressing *71 then Send/Dial and it will ask the parking spot number you want to pick up. Many companies will have the receptionist have several parking spot buttons and then use instant messaging to message the person that they want to pick up the call telling them what parking spot the call is in. Without a parking button you can still park a call by pressing transfer, pressing *70 then Send/Dial, and it will then tell you what parking spot your call was parked in. It takes the next available parking spot number. If you have cordless phones we recommend printing a label on the it with reminders to unpark *71 and park *70.
Cloud phone systems have what are called Smart Keys. They are just key’s that change depending on what you are doing. So if you’re not on a call then you have New Call, Directory, Paging, Forward, and DND (Do not Disturb). And if you’re on a call then the Transfer and Conference button appear. If the phone is ringing you would have answer, reject or ignore. There are 4 smart keys’ and look at your screen while you are doing different things and you will be able to see the various functions those keys can do for you.
VX300 6 button/VVX400 12 button phone, you have to the left and right of your dialpad some important buttons. On the left-hand side, you have transfer, messages, and hold. On the right side you have headset, speakerphone, and Mute.
How to Intercom – Just press *1 then the extension of who you want to intercom and press send/dial. You will then be able to just talk and speak over there speaker without them having to answer. This works regardless of what physical location you are in. So, you can intercom people that are in other offices also. Keep in mind if they are on the phone when you intercom it will work just like a phone call they will see you calling in and can answer it.
How to Page – Hit the paging button, the default group is everyone. This only works to phones that are at the same location as you. Try it!
How to Conference Call – While you’re on a call, one of the smart keys should say Conference, press it, dial the second number and then press conference again. While you are on a conference call one of your smart keys will be to split, which breaks the call into two separate calls.
How to Transfer – The ways we transfer calls are blind and attended. Blind means you just send the call over to the other person without speaking to them first. Here it is please try this is it very simple. Keep in mind with a VVX300/400 the top right button next to key pad is the transfer button. On the VVX500/600 it is a smart key on the touchscreen.
Blind Transfer – Hit “Transfer”, the dial the person you want to send the call to, Hit “Transfer” again. You can transfer to outside numbers like cell phones, toll free numbers, whatever number you want to send a call to.
Transfer to Voice Mail – This is just a blind transfer where the number you dial is the mailbox number then * and Hit “Transfer” again. Generally, most companies use the same mailbox number as their extension number. You can also have group/department mailboxes, or announcement only mailboxes for example for directions.
Here is way to get more professional on how you deal with calls, how about announcing to the person you are transferring who is calling? With an attended transfer if they do not want to take the call OR you could not reach them, you can go back to the caller and let them know. Then you have more options. Handle it yourself, try another number, try another person, send them to a voicemail box, take a message, or how about send them to a parking spot where anybody from any extension could pick up the call. Keep in mind call’s parked will ring back to whoever parked them in 2 minutes if not picked up.
VVX 500/600 Touchscreen VERY HELPFUL TIP – After you hit transfer, click your ext number next to the left arrow up top right of screen to get to your buttons on phone.
Attended Transfer – Hit Transfer, then dial the person you want to send the call to, when they answer you can announce who is calling for them. If they want to take the call just “Hit Transfer” again. If they do not want to take the call you then press “Cancel”. That will put you back on the phone with the caller and where you have all the options again…
How to Set up Voice Mail – Quick helpful tip, your default passcode is your extension number. Press the envelope in the upper left side of a VVX500/600 touch screen phone, or press the middle button to the left of the key pad on a VVX 300/400 phone. It will ask you your passcode and walk you through the rest. If you happen to be at another extension and want to get into your voicemail just dial * and your extension, then dial/send and you can get into your mailbox from any phone.
How do you know you have a Voicemail – On a system like this there is really no excuse, you have a blinking red light on your phone yes that is what older systems did also but now you have voice mail’s that can be emailed to you with the full message included you can listen to , they can be transcribed to you with google transcription and sent via email, you can in addition have a have text message sent to your cell phone when there is a message.
Sending someone a Voice Mail – This is a nice capability where you just dial their mailbox and then * and dial/send and you can record a message for anyone in your company with a mailbox. This can be used for broadcast mailboxes for groups as well if your administrator has set up broadcast mailboxes.
Directory – The easiest to add contacts to your directory is to go to your history of dialed, received and missed calls. On a VVX300/400 you can press the home key which is the bigger round key on the right-side middle of phone. On a VVX 500/600 just press the Directory button. Then scroll to find any call and press I (vvx500/600) , or Add (vvx300/400) , and save it to your directory. You can change the name, change the ringtone, and have some other options you can play with here.
Do Not Disturb – Just press the smart key DND on the VVX500/600 which will toggle it off and on.
Forwarding Calls – You are able to from your extension set up calls to forward to other extension’s or outside lines. To enable call forwarding, press Forward from Home or Lines view. Select the forwarding type to enable, enter a forwarding number, and press Enable. To disable call forwarding, press Forward from Home or Lines view, select the forwarding type to disable, and press Disable. Once you are given access to a user portal for your extension or if you are the administrator you can have rules that control forwarding like time frames, ringing multiple places at the same time and more. We will have a blog post all about forwarding and routing options and how to control them.
Practice makes perfect and you may find another employee in your company with the most experience with these new phones is a helpful lifeline to reach out to for help. Please click this link for a printer friendly pdf version of this blog post……CLICK FOR PRINTER FRIENDLY PDF VERSION
Of course, we are available to answer any questions as well.
Blueline UCaaS Support Team
Chat with us is a quick way to get a quick answer – go to our web page www.bluelinevoip.com and chat with us on the bottom right.
Email to open a ticket with us: [email protected]
Call Us: Tel: 888-551-0811


